🔀 Lead Routing
Last updated: February 26, 2026
Overview
Meet Routing allows for you to create or use an existing webforms to intelligently route your leads to members of your team.
Quick Start Guide
1. To create a new route, go to Links > Routing and click on the Create New Route button in the top right hand corner
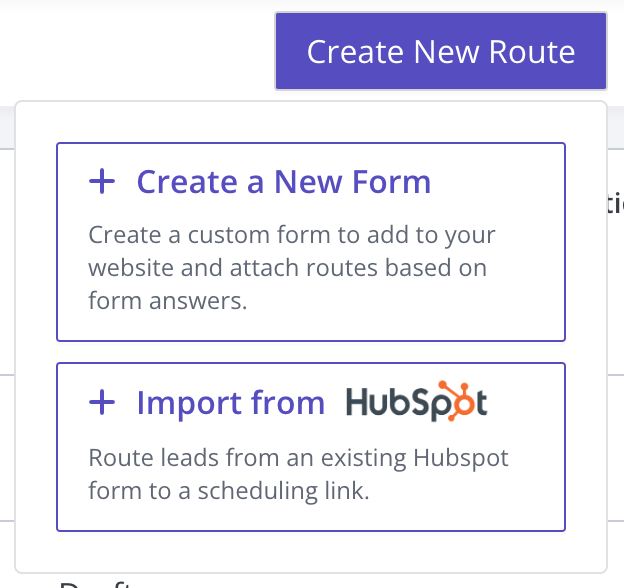
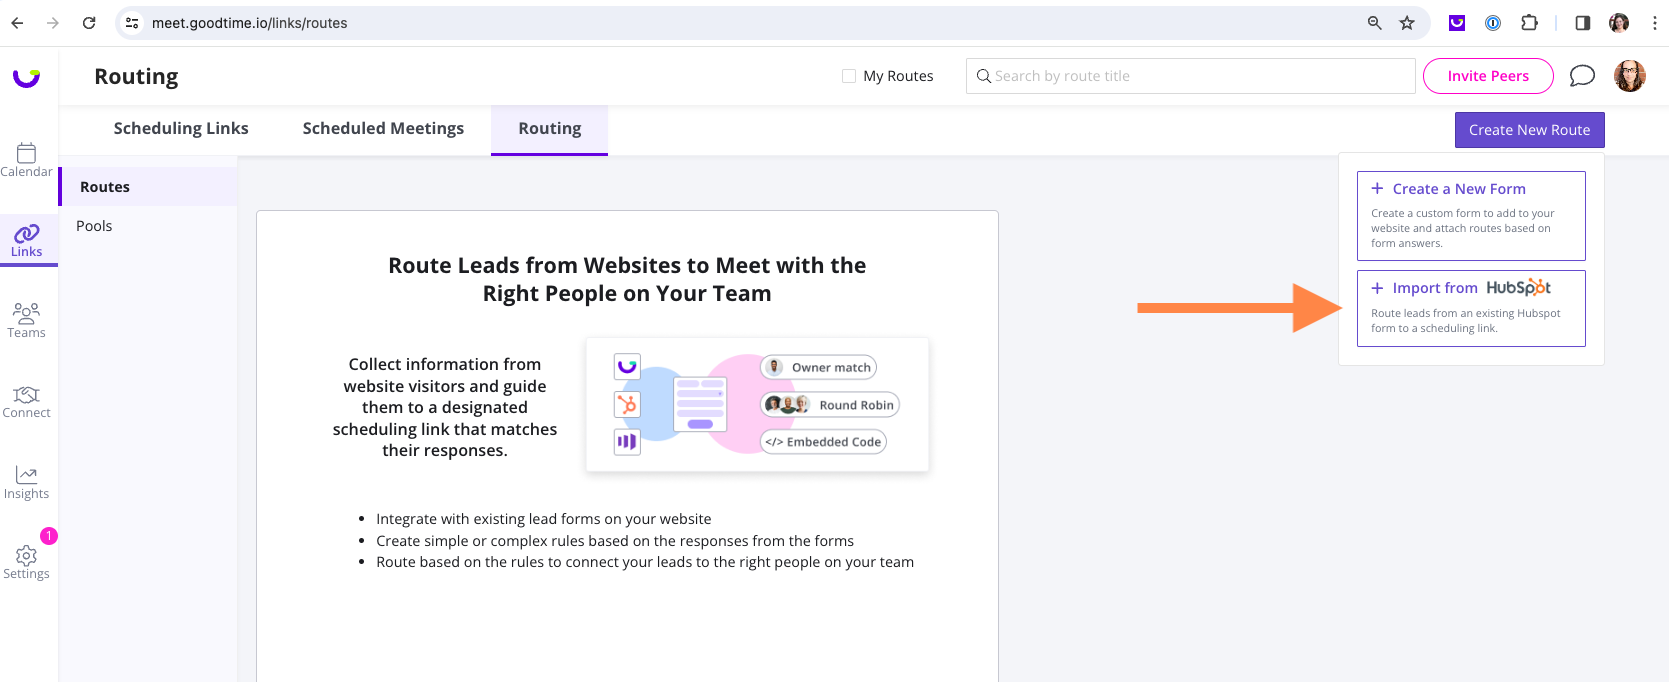
2. You will have 2 options, Create a New Form and Import from Hubspot, select the one that applies to you
-
Create a New Form - create a new form from scratch that you can host on a website. To learn more, find more details in the Form Builder section below.
-
- If you are creating a form from scratch: Create the desired form fields you want visitors of your website to fill out
-
NOTE: Based on one or more of these form fields, you will later be able to route visitors to meet with different people at your organization.
EXAMPLE: I want to create a Sales Lead Form that routes marketing traffic leads to the appropriate Account Executive. One of the questions I use to decide who to send the traffic to may be the size of the organization.
-
-
Import from Hubspot - if you already have existing webforms created by Hubspot on your website, you can important an existing form
-
- If you are importing a form from Hubspot: verify from the from preview that you have selected the right form.
- NOTE: Depending on how you styled the form, the form may look different than your existing form. Verify that you have the correct fields.
-
3. After setting up the form, press `Add Routing Logic` to continue to create rules to route visitors who fill out the form to meet with the right people on your team.
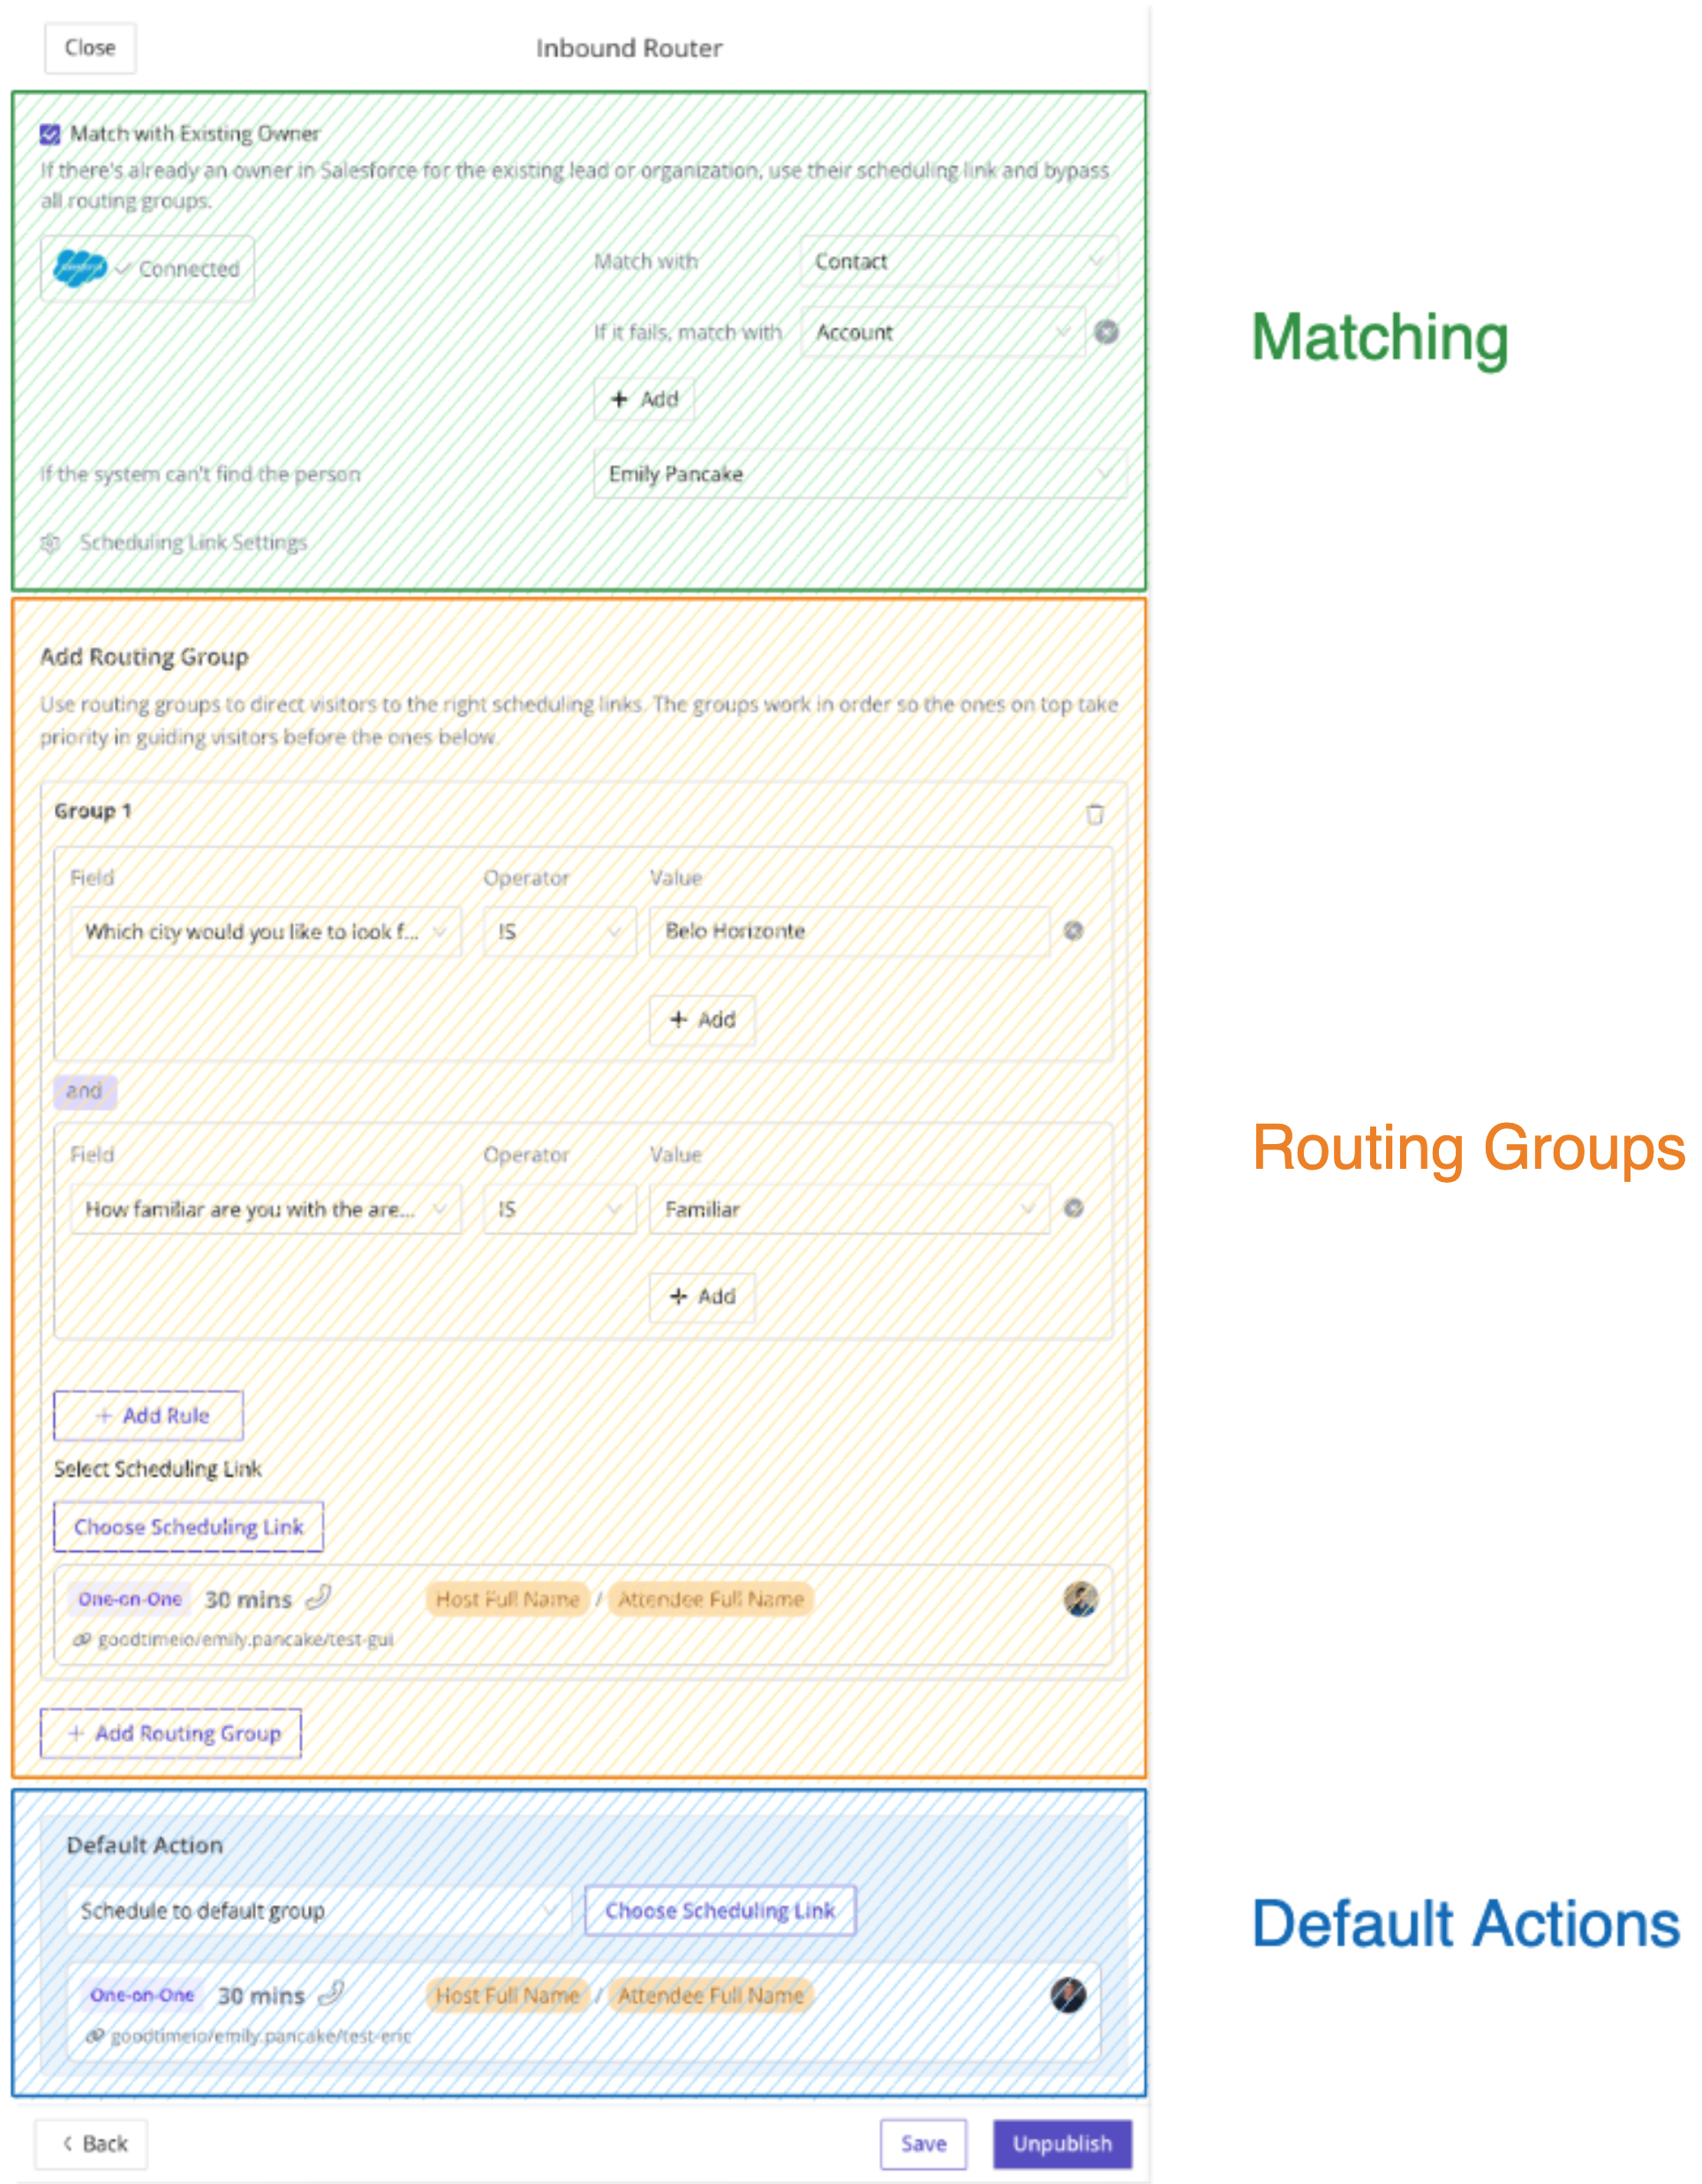
4. If you’d like to integrate with Salesforce to match visitors to existing owners in Salesforce, check the `Match with Existing Owner` option and follow instructions. For more details on how to set up the integration with Salesforce, you can refer our Salesforce Integration
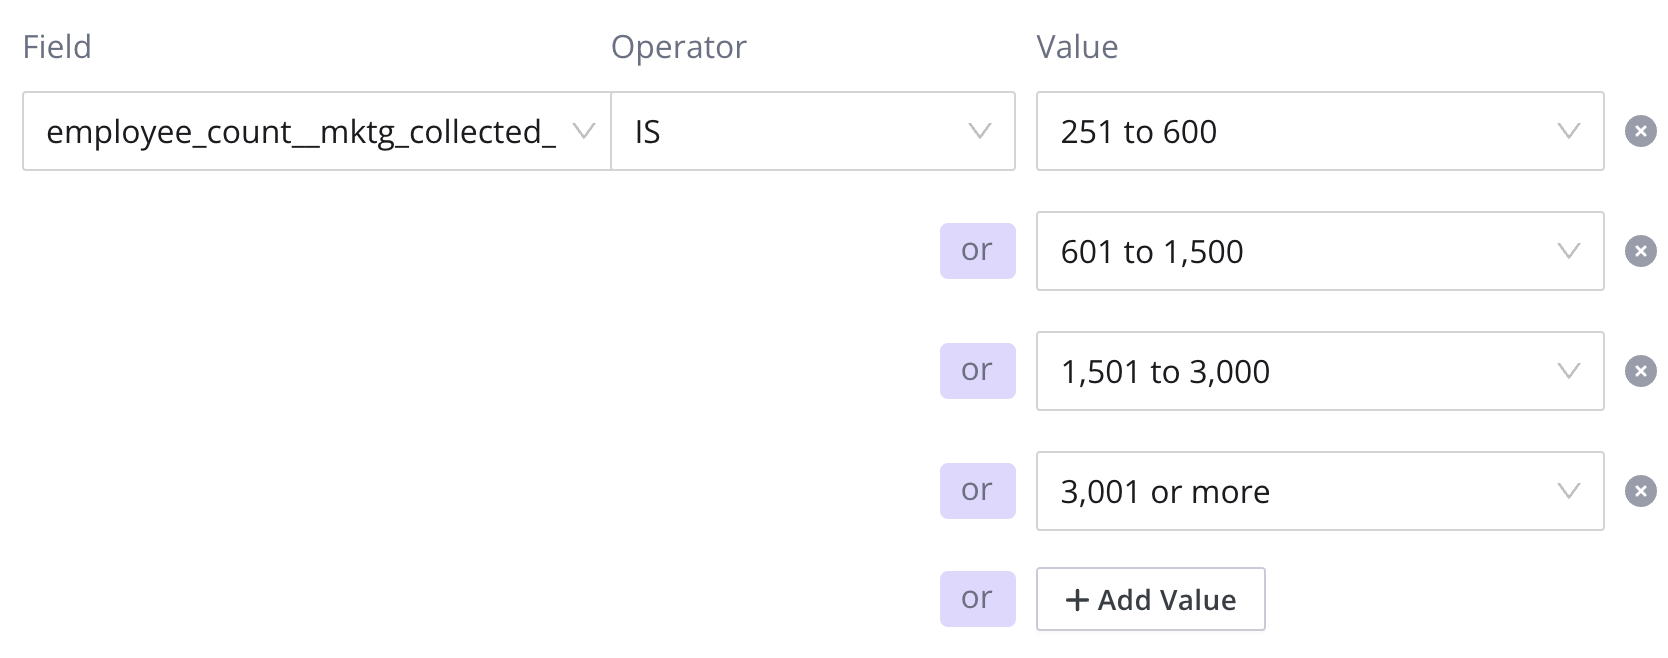
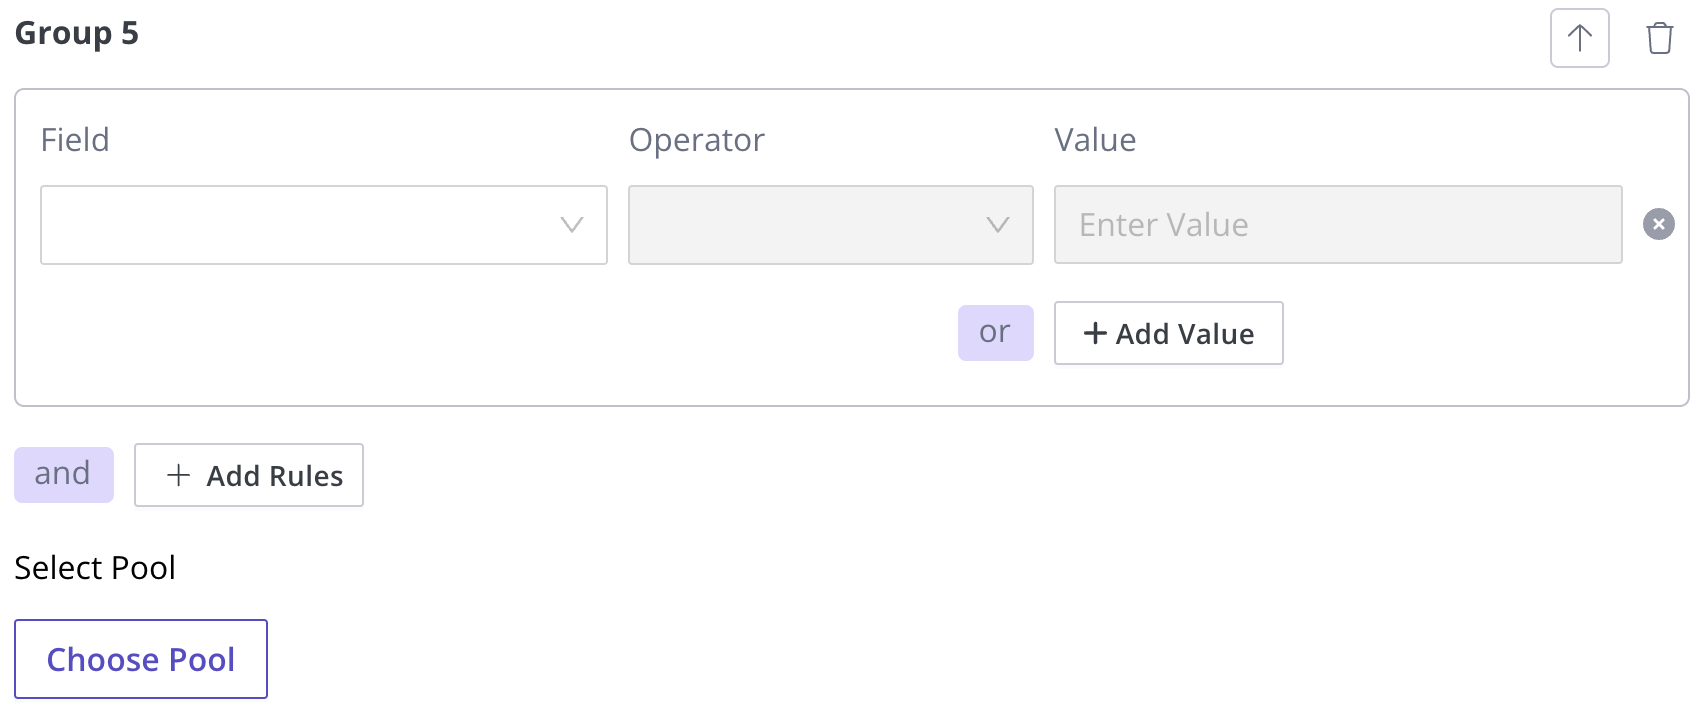
5. Next add routing groups. Each group will allow you to assign a set of rules based on the form fields that a visitor has entered. Each group can be configured to use basic or complex Boolean Logic rules to match visitors. Once matched, the group will route the visitor to the assigned Routing Pool for the group. In the example below, a form field that collects the size of the organization can be used to determine a make a match
- NOTE: Routing Groups are cascading from top to bottom. If more than one group’s rules match, the Route will select the group closest to the top (smallest group number).
6. After setting the rules to a Routing Group, you want to create or assign an existing Routing Pool. Routing Pools are either an individual, a group, or a round robin group of individuals that can be assigned to meet with the visitor.
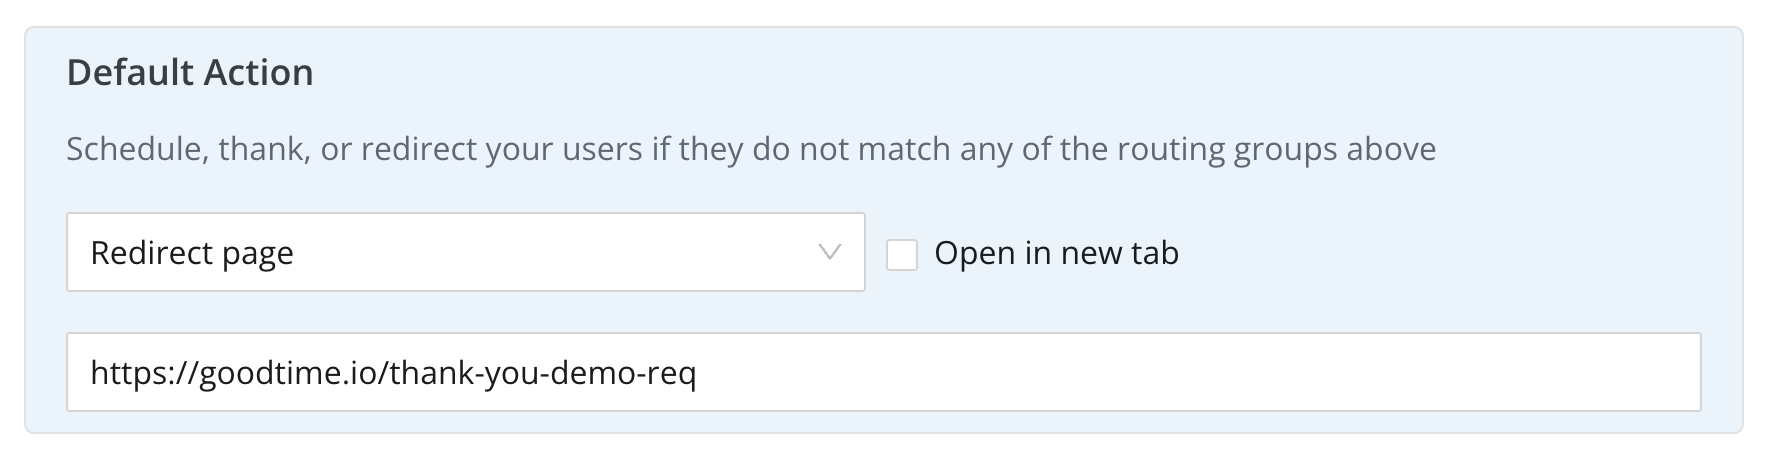
7. After creating the Routing Groups and assigning Routing Pools to each, you can add default behaviors to help direct traffic after visitors fill out the web form. There are two categories:
- Default Actions for visitors who matched to a group. You can have a specific default action for just visitors who matched to a Routing Group.

- General Default Actions cover the rest of visitors. Note, if the option to take actions for matching visitors was not selected above this section, these default actions will apply to all visitors
8. Save the Route if you want to save your work so far and continue editing the Route in the future
9. You can also Publish the route if you’d like it to start using it immediately
- If you publish the route, don’t forget to copy and paste the code you need into your website where you’d like to place the custom form or enhance an existing Hubspot form
Features
Form Builder
You can create your own custom forms inside of GoodTime Meet. This allows you to get started with Routing without having to have Hubspot forms or other third party lead forms available to you.
To create a new form from scratch, inside of Meet visit Links > Routes > and click the button Create New Route
Form Basics
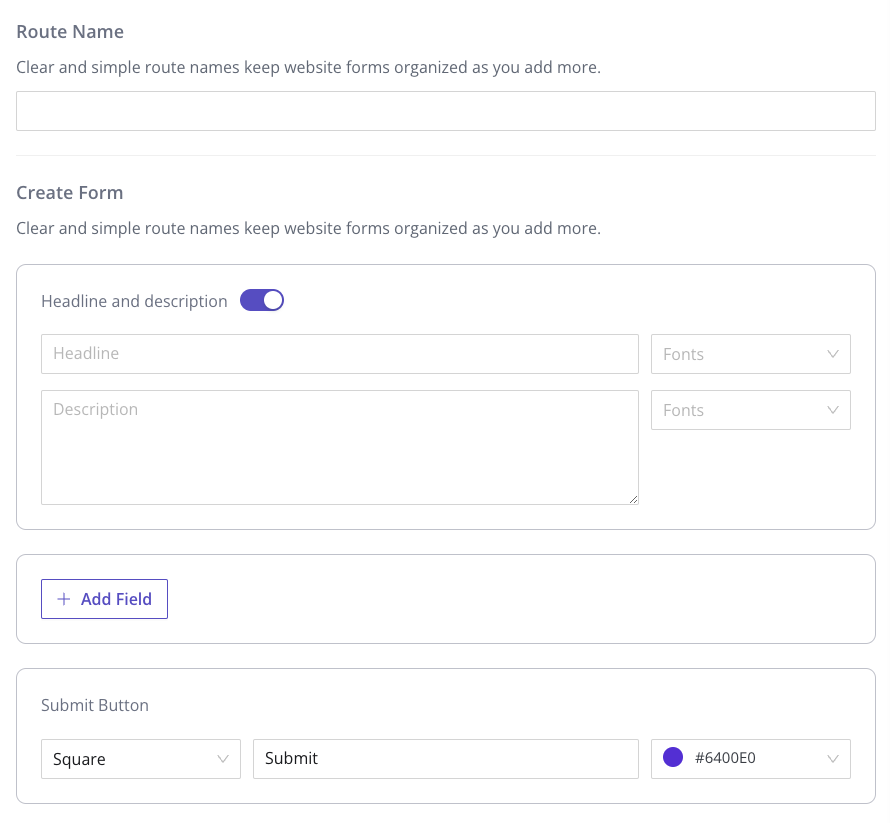
You can quickly create beautiful custom forms by using the form creator. Give the form a simple name (Route Name) that’s easy to associate with what you’re collecting. Remember you might create more than one form.
You can also add a Headline and description to the form and customize the font as well to make sure you can match your brand.
Add any number of form questions and even customize your form submit button text and color.
Field Types
You can select from a list of different field types when creating customs for your form. The standard fields Name, Email, and Phone Number come with validation and can be quickly added. You can also add a set of custom form fields using common components such as Dropdown, Radio buttons, Checkboxes, and various Textboxes.
Router
The Router is at the center of the Routing platform and allows you as the administrator to control where your leads will go. The router has three primary sections: Existing Owner Matching atching, Routing Groups, and Default Actions. These three sections make up the core Routing Logic inside of the Meet Router.
NOTE: Each of these sections will cascade to the next if a rule does not apply within the section. The system will try to find a match in the following order starting with Existing Owner Matching→ then Routes → and finally Default Actions.
Routing Pools
Routing pools make it easy to keep track and assign visitors from your web forms to different members of your teams.
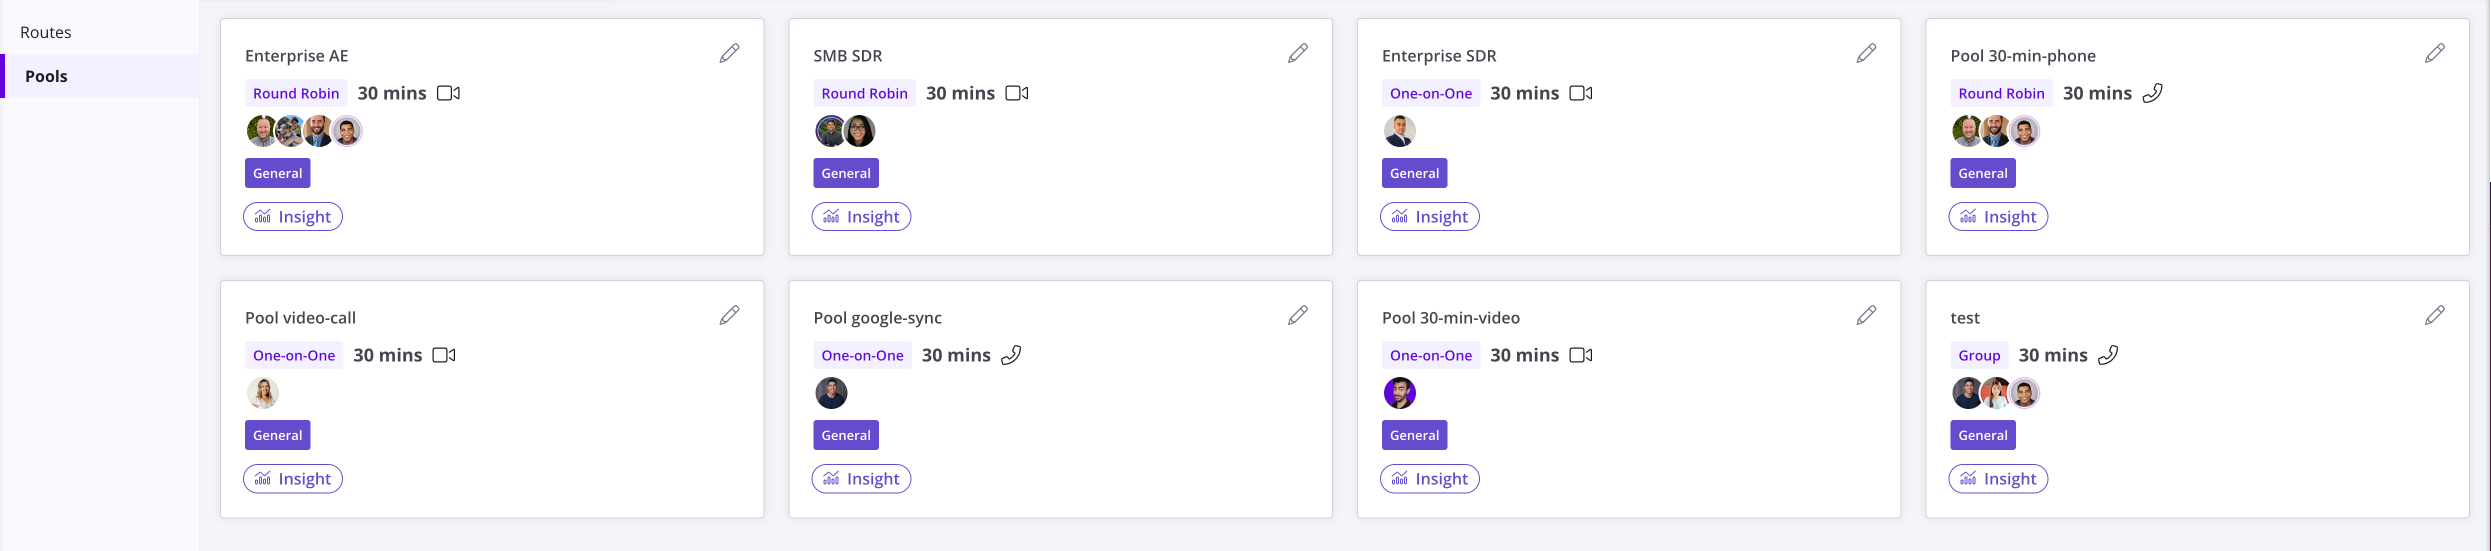
Creating Routing Pools
Pools can be created in two places, on the Pools page itself as well as while you’re creating a Route.
-
Create Pool from Pools Page: To create a pool on the Pools page, navigate to the Pools page inside of Routing and then click on the
Create New Poolbutton in the top right hand corner.
- Create Pool from Route: To create a pool from within a route, in Step 2 of the Route creation process, Add Routing Logic, as you create Routing Groups, at the bottom of each group is a button to Choose Pool. After clicking the button, click on the Create New Routing Pool to create a new one.
Routing Pool Configuration
If you use GoodTime Scheduling Links before, Pools should feel very familiar. The Routing Pool template allows you to set the regular parameters for a meeting that will be scheduled with the Routing Pool.
Options
- Meeting Duration - set the length of the meetings that will be booked from this routing pool
- Meeting Type - set the communication channel (Phone, Video, or In Person) that the meeting will be hosted on
- Availability - set how much time into the future calendar availability should be shared
- Note Specific Time will allow you to block off very specific days but does not continue to roll availability forward as time passes. Remember that specific time pools will expire after the last date and time that is shared (unless you return and update the specific time option
- Pool Name - a name for the pool to make it easy to discover
- Attendees - set who from your team should meet with the visitor. Note there are a few options
- Single - match to a single or individual at your organization
- Group - you can also add multiple attendees. The system will automatically find time that all attendees can make it (you can also mark individuals as optional if you don’t want to take into account their availability)
- Round Robin - cycle between a group of individuals (share leads with a group of people, this is great for sales teams, customer success teams, support teams, and other organizations that leverage multiple teammates to support a group of customers)
- Calendar Invitation - set the details of the calendar event that is created when a meeting is booked with a visitor. You can configure the calendar the events are written to as well as set the category to further dig into insights.
- Require Attendee Details to Book
- Advanced Settings
Owner Assignment
If an existing owner was not assigned in Salesforce for the corresponding inbound lead, GoodTime Meet Router will attempt to update or create a new ownership record based on who was selected in the Routing Logic.
Coming soon: The ability to select which object(s) to assign the ownership in Salesforce (i.e. Account, Contact, Lead, or Opportunity).
Routing Integrations
Salesforce
You can integrate with Salesforce to match existing account owners as well as sync back newly assigned owners to keep ownership aligned.
To learn more about how to set up this integration, please refer to our integration docs: Salesforce Integration
Hubspot
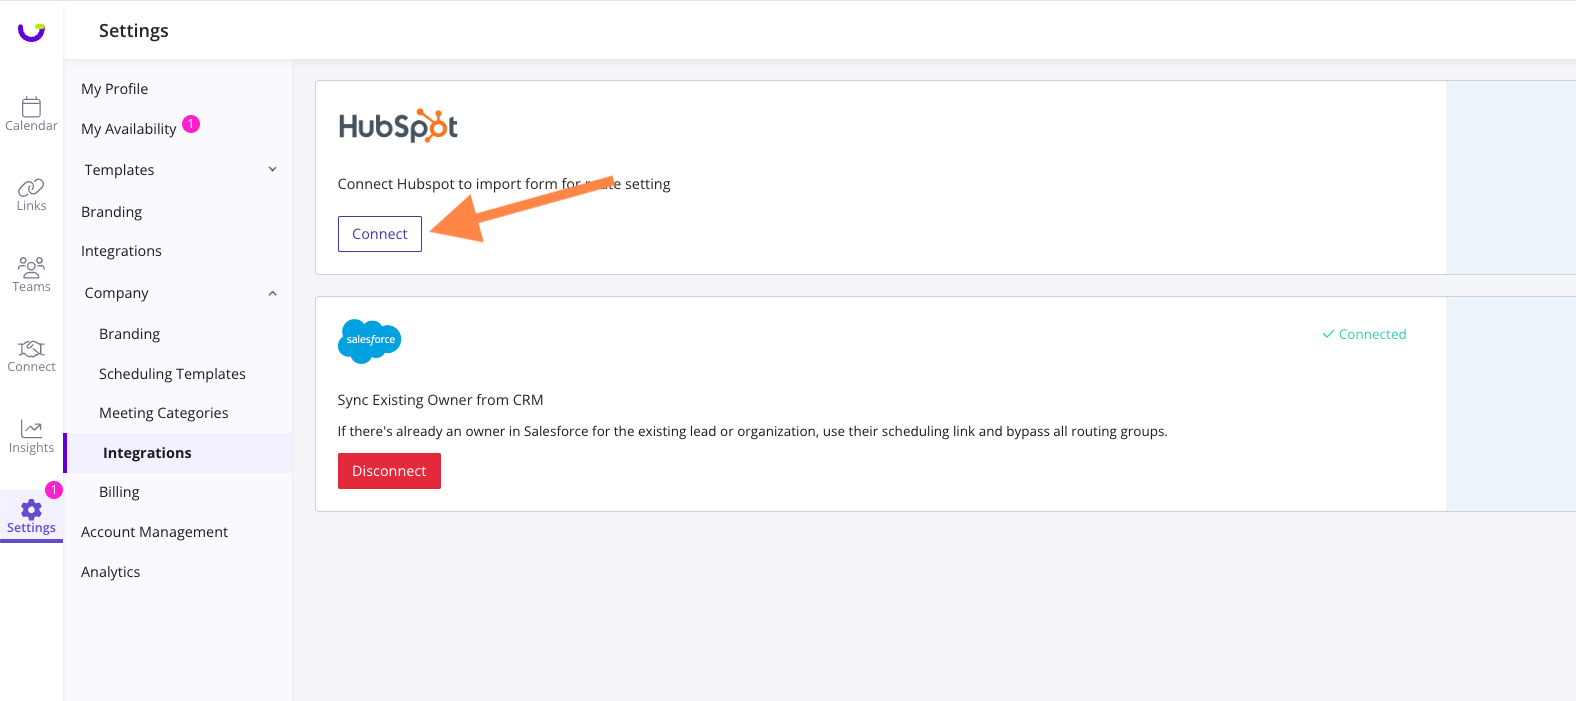
Hubspot form integration allows for you to base routing rules on existing Hubspot form fields. After a prospect, customer, or candidate fills out a Hubspot powered form, Meet Routing takes over and can share availability with the right Account Executive, Support Specialist, Recruiter, and more.
To integrate with a hubspot form, a company admin should start here at Settings > Company : https://meet.goodtime.io/settings/companyIntegrations
Follow the prompts to connect your Hubspot account. (You can also accomplish this connection from the Create a New Route button)
Navigate to the routing page. https://meet.goodtime.io/links/routes
Click on Create New Route, and Import from Hubspot
Give your route a unique name, and choose a Hubspot form.
You are now integrated and creating a route for your form!
Complete the route. Save and Publish the route. Copy the embed code and paste into your website on the same page as your form.
💡 Please note, any Hubspot form you choose must be set to a raw html form. In the Hubspot forms page, if you navigate to edit your form, and select "Style & Preview" tab, there is a toggle called "Set as raw HTML form.”
Here's a hubspot reference for the setting (scroll to bottom of article): https://knowledge.hubspot.com/forms/how-can-i-share-a-hubspot-form-if-im-using-an-external-site
Hubspot
Hubspot fo